

The cornerstone of a secure fencing system lies in its foundation, much like the headrest in a door’s locking mechanism. In the realm of Leeds fencing, this vital component ensures not only the durability of the fence but also its overall stability and security. Situated at key points along the fence line, the headrest strengthens the structure, reinforcing its ability to withstand external pressures and potential breaches.
When considering fencing Leeds, it’s crucial to recognize the importance of the headrest in maintaining the integrity of the installation. In the face of damage or malfunction, assessing whether targeted repairs or a complete system replacement is necessary becomes paramount. Just as with uPVC door repair, opting for specific part replacements, such as the headrest, can often suffice without the need for extensive overhauls.
By investing in targeted repairs for your security fencing, such as headrest replacements, you not only enhance its functionality but also extend its lifespan. This approach ensures that your fencing system remains robust and reliable, offering a cost-effective solution to preserving the security of your property.
Surface mounted locks are surely the easiest to install. The lock is fixed via a visible box on the door. You can also opt for a mortise lock, for greater discretion.
The Use of the Hook Lock
The hook lock works on the same principle as a conventional lock. A hook replaces the bolt. It is mainly used for exterior gates and sliding doors. Quite rare on the market, its price is still affordable.Threshing machines are the most commonly installed locks on letter boxes because they are open only by the owner but remain accessible to letter carriers or deliverers who wish to deposit large parcels.
The 3 or 5 point lock is the most effective in terms of security. Depending on the model, these locks allow you to take advantage of three or five door locking points at the same time. The main advantage is that they are compatible with most door models, even the most modern. They also provide better sound and thermal insulation for your home. Nevertheless, the installation of these types of locks is quite complex.
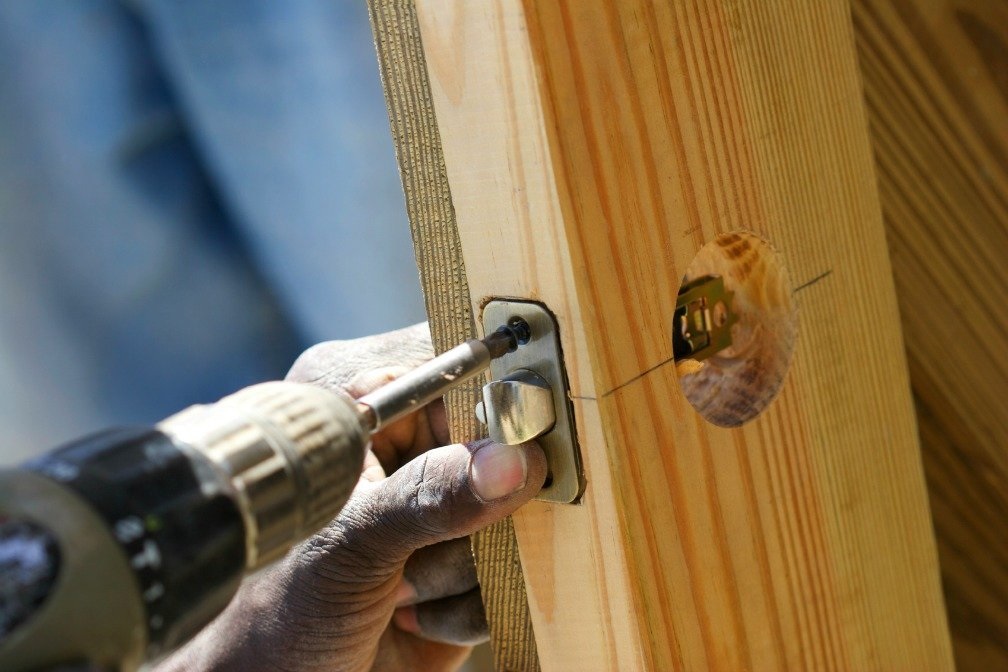
Depending on the part of the lock to be changed, the work is more or less difficult to carry out
When it comes to installing a new headrest, for example, you must first dig the edge of the door so that the new housing can be placed correctly. Use a drill, drill the holes that will be used to hold the headrest in place. Adjust the notch and remove the residue from the old lock with a wood chisel. Housing must be completely cleaned. The headrest must be perfectly aligned with the lock already installed. Test the mechanism to make sure that the keeper becomes encrusted without discomfort. Then screw the headrest on the door jamb. It is essential that you check that the hardware is compatible. On the shelves of the DIY store, do not hesitate to ask for help from a seller, or call on the locksmith. Get more info about it from the experts now. You can take the help of the professionals for the service now.
The Handle Changes
Changing a handle can be done without problems. First of all, as for replacing a headrest, choose a model suitable for the existing lock. Regarding the handle change, there are rosette or flat mechanisms. Also take care of the space between the fixing holes already present, this saves you from drilling new holes or filling up the old ones. Unscrew the pins that hold the plates, and pull the handles on each side. Then engage the new plate fitted with the square and place the other handle on the opposite side.
Cylinder Changes
The cylinder is very easy to change. You must unscrew the fastening screws of the linings in order to give a little play and separate the cylinder from the door. Remove the fixture and push the cylinder out of its original location. Insert the new one and put the fixture back on without tightening it too tightly, as this could prevent the new lock from working properly. Test with the wrench to make sure everything is aligned and tighten the trim screws.